Serum from Xfer Records has been out for a few years now and at it’s initial release, it was THE hottest wavetable synthesizer since Native Instrument’s Massive. With a plethora of wavetables, and endless modulation options Serum quickly became a favorite among electronic producers. In this article we’ll make a good starting point patch for a dirty Reese bass sound.
Today I’m going to show how you can utilize Serum’s multiband compressor to add some nice grit to a classic Reese (detuned saw wave) bass sound.
For both oscillators A and B choose the Basic Shapes wavetable. Be sure to turn on oscillator B. Change the wavetable position until the Saw wave is selected. Drop both octaves by 1 or 2, depending on what note you’re playing, we want to get a pretty low tone. By adding some unison and adjusting the detune knob we can create some width to the overall sound. Set the unison amount to like 4 or so on each one to add additional voices, and adjust the detune to your liking. The more you add detune the wider the voice spacing. On oscillator B I like to turn on the “sync” warp mode and either automate or adjust the amount until I get a sound I like. Sync basically doubles up the waveform the higher the amount set, and this can create some neat harmonics.
Using a low pass filter on the main panel filter, you can strip away frequencies that you may not necessarily want coming through to the FX section later. Enable the filter for both oscillator A and B and play with the frequency. Sometimes I’ll use a notch filter with some weird multi-envelope & LFO modulation to really create movement in the sound..

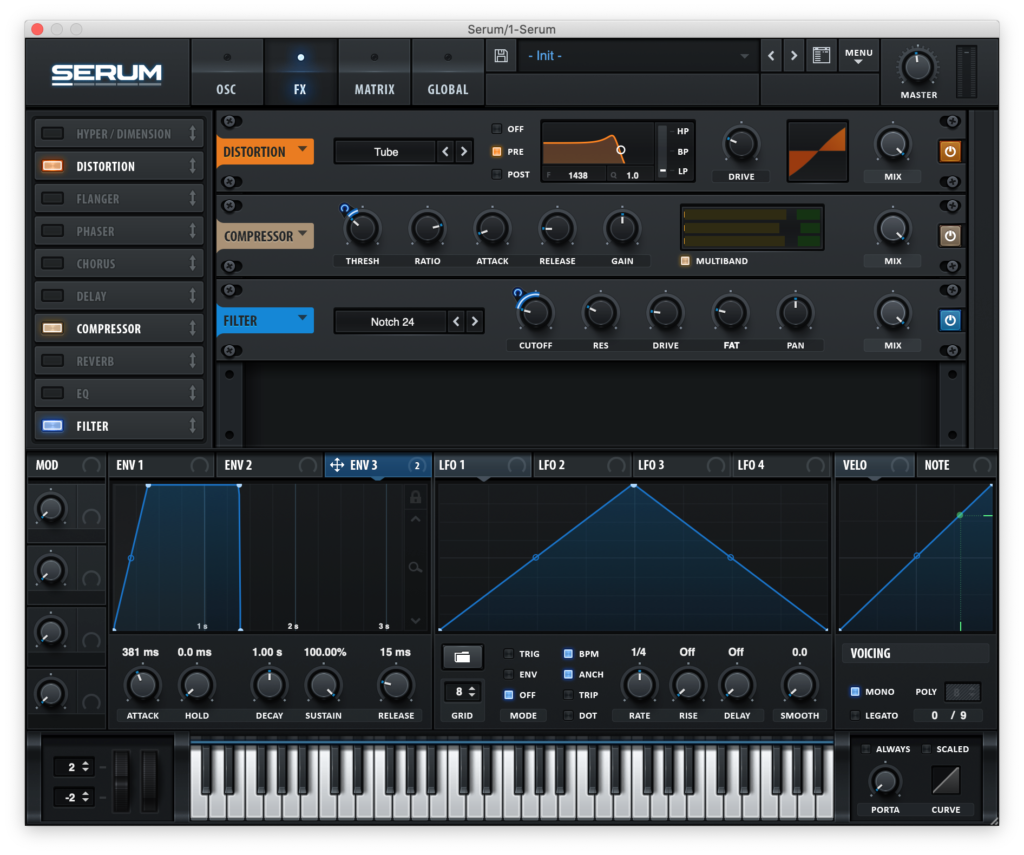
This is a pretty good starting point so far I think but you can take it to another level and give it more umph with the FX section. Click on the FX tab and enable the Distortion, and Compressor effects,. Enable the “Pre” setting for the distortion module’s filter and play around with the drive. This mode means the filter is applied before the distortion. I like to play around with which distortion algorithm it uses as well and see what works.The Diode, Lin. Fold and Sin Fold’s can really distort the sound. Change the dry/wet mix value to see what kind of sounds you can get.
Once your distortion is set to your liking click on the “Multiband” settings on the Compressor unit. Turn the threshold to about -10db and you should hear some new harmonics when you play a note. Play with the attack, release and gain settings to dial it in to get the desired tone. This can take some playing around with. Again, try small automation amounts to different settings to add movement to keep things interesting.
Things may sound a bit too harsh in the higher frequency range, or you want to throw a good notch filter on there, I enable the Filter effect and will typically play with different filter types. My favorite Serum filters are the Reverb, French LP, German LP, and the morphing filters. Playing with these effects and automating different parameters can be key in getting unique sounds. Be wary of your master volume on the track and if needed turn it down to get it out of the red.
Synthesis is all about experimentation and leads to a unique individual sound as an artist. Don’t be scared to try new things. The best quote I’ve made when asked about music production goes, “I don’t try to solve the world’s mysteries. I just push buttons and shit happens.” There are no rules when it comes to electronic music. Do what sounds good to you and don’t be afraid to twist knobs and see what comes out of it.